How to Build an AI-Powered Customer Support Agent with OpenAI and AzureML
In this tutorial, I'll guide you step-by-step in creating an intelligent AI Customer Support Agent using OpenAI embeddings and the FAISS vector store. The project was developed on Google Colab, with Google Drive serving as the storage solution. The provided code snippets are illustrative—you're welcome to customize them with your own datasets, alternative models, or different backend services.
Tools & Tech Stack
Python 3.8+
OpenAI API (text-embedding-3-small)
FAISS (vector similarity search)
Google Colab (optional for deployment)
Google Drive (optional for deployment)
Pandas, NumPy, Matplotlib
Folder Structure
cs_agent/
cs_dataset/
cs_dataset.csv
vector/
src/
helper.py
main.ipynb
requirements.txt
Let's walk through each step in detail, breaking down the process clearly and methodically to ensure a smooth implementation
1. Unzipping Project Files in Google Colab
This command extracts the project files in Google Colab when working with data from Google Drive.
call_llm() - Interfaces with large language models
Step 4: Load Dataset
This code snippet reads the CSV file and loads its contents into a pandas DataFrame. Line 4 displays a preview of the data (first few rows) to verify successful loading.
# Read CSV file into DataFramedf = pd.read_csv('cs_dataset/cs_dataset.csv')# Display first 5 rowsdf.head()
Code Explanation:
CSV Reading:pd.read_csv() reads the CSV file and creates a DataFrame object
Automatically handles header rows
Infers data types by default
File Path: The path 'cs_dataset/cs_dataset.csv' specifies:
Subdirectory containing the file
Exact filename with .csv extension
Data Preview:df.head() displays:
First 5 rows by default
Column headers
Sample data values
Expected Output:
     flags  instruction                                     category     intent            response
0     B   question about cancelling order {{Order Number}}    ORDER  cancel_order  I've understood you have a question regarding...
1   BQZ   i have a question about cancelling oorder {{Or...    ORDER  cancel_order  I've been informed that you have a question ab...
2  BLQZ   i need help cancelling puchase {{Order Number}}    ORDER  cancel_order  I can sense that you're seeking assistance wit...
3    BL   I need to cancel purchase {{Order Number}}         ORDER  cancel_order  I understood that you need assistance with can...
4  BCELN  I cannot afford this order, cancel purchase {{...    ORDER  cancel_order  I'm sensitive to the fact that you're facing f...
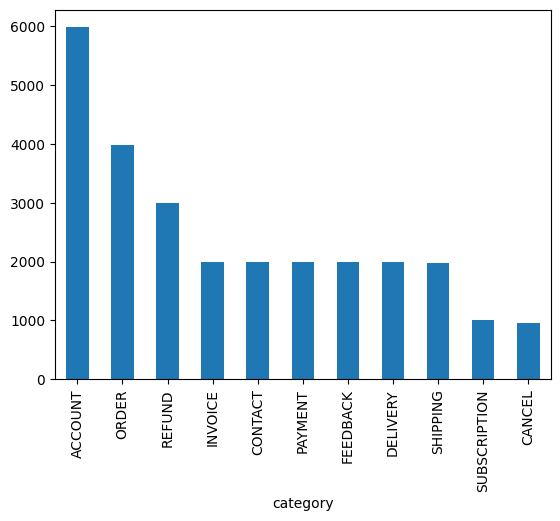
Step 5: Plot Category Distribution
The following code generates a visualization of customer question categories from our dataset. Since this is purely for demonstration purposes, you may choose to skip this section.
df['category'].value_counts().plot(kind='bar')
Code Explanation:
Column Selection:df['category']
- Accesses the 'category' column from DataFrame
Value Counts:.value_counts()
- Calculates frequency of each unique category
Returns a Series with categories as index
Counts as values
Automatically sorts by frequency (descending)
Plotting:.plot(kind='bar')
- Generates a vertical bar chart
Categories on x-axis
Counts on y-axis
Uses matplotlib under the hood
Output:
Fig. 1 - Distribution of customer support ticket categories
Step 6: Building a Category-Intent Mapping Dictionary
The following code efficiently creates a mapping between support ticket categories and their associated intents, revealing the relationship between broad issue types and specific customer needs.
from collections import defaultdict# Create dictionary to map categories to sets of intentscategory_intent_dict = defaultdict(set)# Populate the dictionaryfor category, intent in zip(df['category'], df['intent']): category_intent_dict[category].add(intent)# Convert sets to lists for final outputcategory_intent_dict = {k: list(v) for k, v in category_intent_dict.items()}
Code Explanation:
Data Structure Choice:defaultdict(set)
- Automatically initializes new keys with empty sets
- Ensures each intent is only stored once per category
Efficient Pair Processing:zip(df['category'], df['intent'])
- Iterates through category-intent pairs without indexing
Set Operations:.add(intent)
- Automatically handles duplicate intents per category
Final Conversion:{k: list(v) for k, v in category_intent_dict.items()}
- Converts sets to lists for easier JSON serialization
- Creates a standard dictionary output
Step 7: Analyzing Text Length Patterns in Customer Support Conversations
The following code analyzes the average length of both customer instructions and agent responses, revealing key communication patterns in support interactions. This diagnostic step is optional and can be skipped if needed
# Calculate average instruction length (in tokens)avg_instruction_tokens = df['instruction'].apply(lambda x: len(x.split())).mean()# Calculate average response length (in tokens)avg_response_tokens = df['response'].apply(lambda x: len(x.split())).mean()# Print resultsprint(f"Avg. token count for instructions: {avg_instruction_tokens}")print(f"Avg. token count for responses: {avg_response_tokens}")
Code Explanation:
Token Counting:.apply(lambda x: len(x.split()))
- Splits text by whitespace and counts words
- Simple approximation of token count
Column Processing:df['instruction'] and
df['response']
- Accesses the customer questions and agent answers
Statistical Summary:.mean()
- Calculates the average length across all entries
Formatted Output:f-strings
- Displays results with clear labels
Example Output:
Avg. token count for instructions: 8.690979458172075
Avg. token count for responses: 104.78903691574874
Step 8: Generating Text Embeddings for Customer Support Analysis
The following code serves as the core component of this project, creating numerical vector embeddings of customer support instructions using OpenAI's embedding models. It utilizes the create_embeddings() method from a helper class located in the /src folder, which calls the OpenAI API to generate these vector representations. To execute this code, you must first sign in to the OpenAI Platform and create an API key, as this is required to produce vector embeddings from your customer training data.
Note: The execution time for this code varies depending on your dataset size. Processing larger training datasets will require more time to complete.
1536 - Dimensionality of each embedding (for text-embedding-3-small)
Step 10 :Creating Efficient Vector Search Indexes with FAISS
The following instruction stores the embeddings in the vector database created in Step 8
index = create_index(vectors, index_file_path='vector/faiss.index')
Code Explanation:
create_index():create_index()
- Custom function that builds a FAISS search index
Parameters:
vectors - Your embedding vectors (numpy array)
index_file_path - Where to save the index file (optional)
Output:index
- FAISS index object ready for similarity searches
Step 11: Loading Pre-Built vector database for Efficient Search
The following instruction loads the vector database created in Step 10.
index = faiss.read_index('vector/faiss.index')
Code Explanation:
faiss.read_index():faiss.read_index()
- FAISS function to load a saved index from disk
Parameters:
'vector/faiss.index' - Path to the saved index file
Output:index
- Reconstructed FAISS search index object
Step 12: Sample Query
This is our query/question for which we want to retrieve answers from our vector database.
query = "how can I change my order? My order number is 501"
Step 13: Performing Semantic Similarity Searches with Embeddings
This code generates an embedding for the query text, then searches the vector database (loaded in Step 11) to retrieve the most relevant matches along with their similarity scores
distances, indices = semantic_similarity(query, index, model='text-embedding-3-small')top_similar = df.iloc[indices[0]].reset_index(drop=True)top_similar['distance'] = distances[0]
Code Explanation:
semantic_similarity():semantic_similarity()
- Custom function that:
Embeds the query text
Searches the FAISS index
Returns matches and similarity scores
Step 14: Processing and Enhancing Semantic Search Results
This code implements semantic search capabilities using large language models to retrieve and present relevant results for customer support applications.
# Extract responses from top matchesresponses = top_similar['response'].to_list()# Display formatted resultsprint(top_similar[['instruction', 'intent', 'response']].to_markdown(index=False))# Generate enhanced LLM responseprint(call_llm(query, responses))
Code Explanation:
Response Extraction:.to_list()
- Converts responses column to Python list